CUES Infinite Campus Setup SAML - SSO Connection
Last Modified on 8/20/2025
Provide Campus Entity ID to RapidIdentity
Tool Search: SAML – SSO Service Provider Configuration
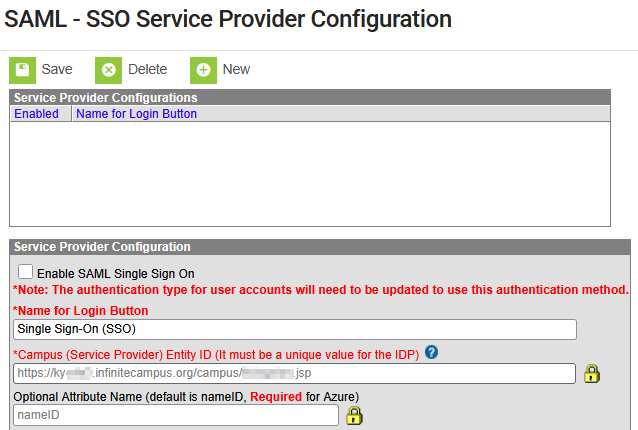
If active configurations exist for Microsoft or Google, there is no need to change them. Please work with your RapidIdentity implementation engineer or RapidIdentity system administrator to assist with this process. An exchange of information is required.
Select New.
Copy the Campus (Service Provider) Entity ID and Optional Attribute Name to provide them to your district’s RapidIdentity implementation engineer.
Leave the screen without saving. When you receive the Identity Provider Metadata URL from RapidIdentity, return to create the configuration.
Define SAML Service Provider Configuration to RapidIdentity
Tool Search: SAML – SSO Service Provider Configuration
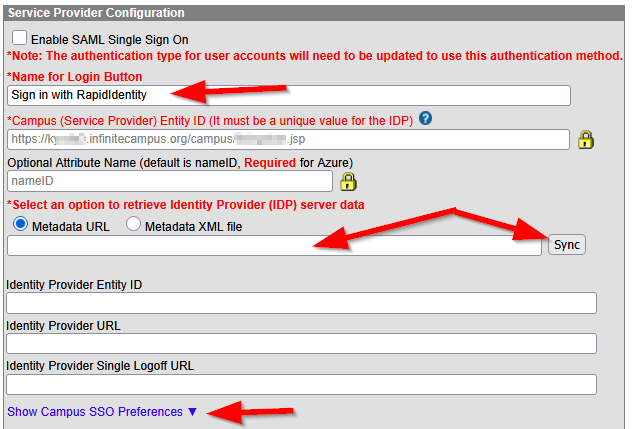
Select New.
Enable SAML Single Sign On: Leave this option disabled until you're ready to initiate testing.
Name for Login Button: Change to “Sign in with RapidIdentity” or “RapidIdentity (FOR TEST USERS ONLY)” while testing.
Metadata URL: Within your RapidIdentity Tenant go to Configuration → Security → Identity Providers → IDP Configuration and Copy the value from Live MetaData URL

Select Sync within Infinite Campus. A pop-up will confirm that the data has been accepted, and the Identity Provider fields will populate.
Select Show Campus SSO Preferences.
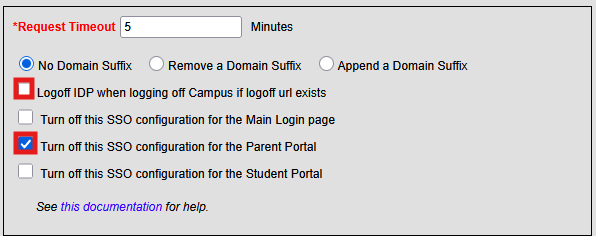
Uncheck the box for Logoff IDP when logging off Campus if logoff URL exists.
Check the box for Turn off this SSO configuration for the Parent Portal. The CUES project will not create RapidIdentity accounts for guardians.
Select Save.
Select the new RapidIdentity configuration from the Service Provider Configurations list.
The Service Provider Configuration will display three data elements that were automatically generated by Campus.
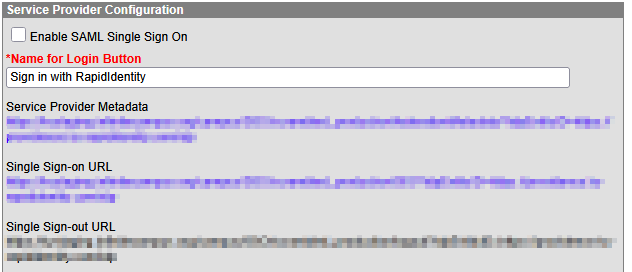
Service Provider Metadata – Copy this URL and use it in the next Step in RapidIdentity.
Single Sign-on URL – This URL is for use in District customized HTML links or icons as desired. This URL will bypass the standard login page and make calls directly to the SSO Identity Provider (IDP) for user identification and authentication. RapidIdentity obtains this directly from the contents of Infinite Campus' Service Provider Metadata URL.
Sign Sign-out URL – RapidIdentity obtains this directly from the contents of Infinite Campus' Service Provider Metadata URL.
Login to your RapidIdentity Tenant and navigate to Configuration → Security → Federation Partners
Click on the three dots beside Infinite Campus and Choose Edit

Click General to open the General Section
Open the Service Provider Metadata and copy the contents into the Metadata section and Click Save. It should look similar to this

Click on IDP Configuration in the menu to the left and Click the Trigger Service Reload and Trigger Web Reload buttons along the bottom.
See the SSO Service Provider Configuration article for more information. Existing authentications configured to Microsoft and Google will continue to work. Once the district has migrated the users to the newly created SAML SSO Configuration through RapidIdentity, these connections can be disabled and eventually removed.
Create a user account using the RapidIdentity SAML Connection
Get a username for testing from RapidIdentity administrator.
Work with your RapidIdentity administrator to create and claim a test account within RapidIdentity. The user must be enabled for Single Sign On in RapidIdentity.
Create a Campus account.
Tool Search: User Account
User Search: Desired person to own the test account.
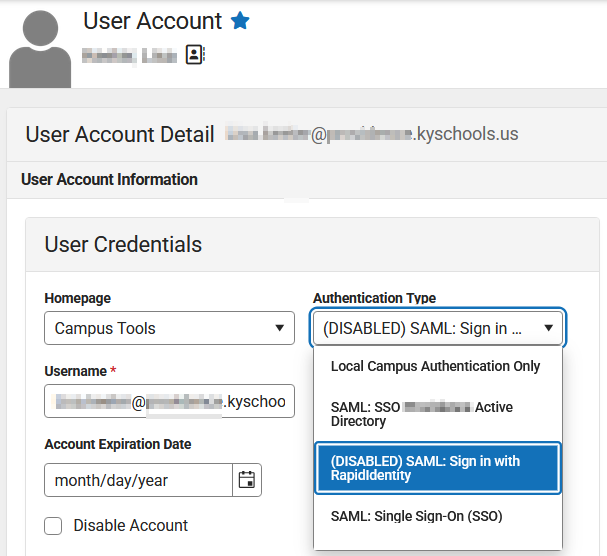
Authentication Type: Select SAML: Sign in with RapidIdentity (DISABLED) will show until the SAML configuration is enabled.
Username: Enter the test username claimed on RapidIdentity.
No Campus access is necessary to confirm that the Single Sign On works with RapidIdentity.
User Groups: None
Individual Tool Rights: None
Calendar Rights: None
Select Save, then Close.
Test the RapidIdentity SAML Login
If possible, schedule time with the RapidIdentity system administrator for this testing. Tweaks may be required to the configuration in RapidIdentity or in Infinite Campus.
Enable the RapidIdentity SAML Configuration
Tool Search: SAML – SSO Service Provider Configuration
Select the new RapidIdentity configuration.

Check the box for Enable SAML Single Sign On.
Select Save.
The RapidIdentity configuration will show a green dot if Enabled.
Attempt to login via the RapidIdentity SAML Configuration
Open a browser that is not logged in to RapidIdentity.
Go to the Campus login page.
Select the “Sign in with RapidIdentity” button. If the district has multiple SAML connections, use the “Select an SSO Configuration” button, then select “Sign in with RapidIdentity”.
The RapidIdentity login screen should appear.
Enter the username, select Go.
Enter the password, select Go.
If Infinite Campus opens, all is well.
Disable the “Sign in with RapidIdentity” connection to avoid confusing users.
Troubleshooting
If the Campus login screen is displayed.
Compare the SAML – SSO Service Provider Configuration to the RapidIdentity SSO setup.
Is the Campus Entity ID and Attribute ID Name the same in RapidIdentity?
Navigate to the Service Provider Metadata URL in a browser to view and compare to the RapidIdentity Metadata.
If “Contact your school or district's tech staff to receive the proper url to enter your username and password.” or
Confirm that the user account’s authentication type is “SAML: Sign in with RapidIdentity” in Infinite Campus.
If the issue cannot be resolved, submit a support case to Infinite Campus.
