CUES Infinite Campus ATC Student Account Provisioning
Last Modified on 3/25/2026
A step-by-step reference for creating and managing a calendar in Infinite Campus to support ATC/out-of-district student account provisioning by RapidIdentity. Only the person/identity and enrollment are necessary to send a student to RapidIdentity for identity provisioning (network login, email). Unless district policies require it, these students do not need to be set up with guardians, households, courses, etc.
Obtain a list of ATC Students needing accounts
Securely obtain a list of students from the ATC of students from outside of the district that need a local account. The following data is needed to ensure the students are added correctly.
State ID
First and Last Name
Grade
Birth Date
Hispanic/Latino (Yes/No)
Race/Ethnicity
Race/Ethnicity Determination
Enrollment Start Date
Enrollment Start Status
Calendar Setup
Create a District Office Calendar Using Blank Calendar
Tool Search: Calendar Wizard
Select the Blank Calendar option, then Next.
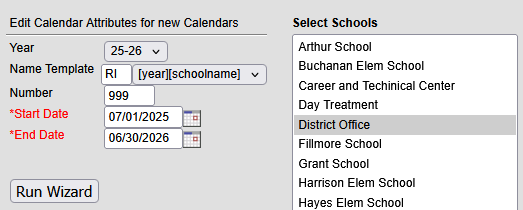
Select the Year for the new calendar (defaults to next year, i.e., 2026-27). If implementing during the current school year, select 25-26.
Type RI in Name Template and select [year][schoolname].
Type 999 in Number so the calendar will be at the bottom of the droplist.
Enter a start date for the calendar in the date field OR use the calendar button to select the first day of the calendar. (7/1/2025)
Enter an end date for the calendar in the date field OR use the calendar button to select the last day of the calendar. (6/30/2026)
Select [District Name] District Office from Select Schools.
Select Run Wizard.
A progress window will then display as elements are created.
Update the Calendar Information
Tool Search: Calendar Information
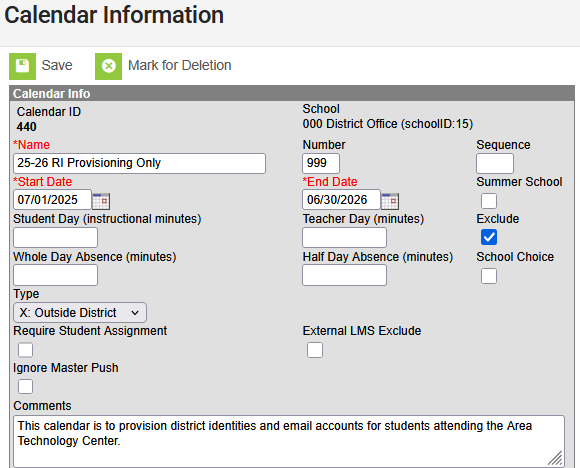
Select Year, School: [district name] District Office, and Calendar: RI in the Context. If it is not available, refresh the browser (Ctrl + R) or log out and back into Campus.
Ensure the correct calendar is displayed.
Change Name to RI Provisioning Only keeping the years.
Check Exclude to remove data associated with this calendar from state reporting extracts.
Set Type to X: Outside District.
When finished making changes, select Save.
Copy data into RI Provisioning Only Calendar
Tool Search: Calendar Wizard
Select the Copy date into Existing Calendars option, then Next.
Select Copy/Append other data elements option, then Next.
Select Source Calendar from the same year that has the grade levels, terms, period structure and day setup that should be copied. A high school calendar may be the best match for ATC students.
Set Destination Calendar as the RI Provisioning Only calendar for the same year as the source calendar.
After confirming the selected calendars, select Next.
For Pick the Data to Copy, check the following items: Term Schedules, Period Schedules, Days, Day Events, and Grade Levels. NOTE: School Months data is not needed since attendance will not be recorded in this calendar.
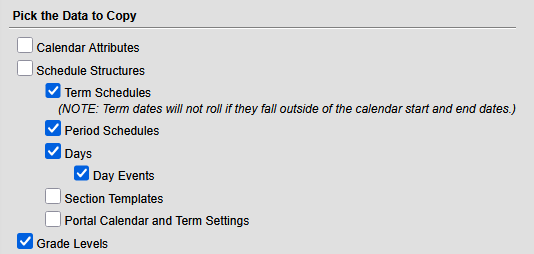
Select Run Wizard.
A progress window will then display as elements are copied.
Review the copied counts of items.
If all zeros, update the RI Provisioning Only calendar’s schedule structure name to match the name of the source calendar’s schedule structure. Then do the copy again.
Verify Grade Level Setup
Tool Search: Grade Level Setup
Ensure Context is set to the RI Provisioning Only calendar.
Confirm that all grades offered at the ATC are defined.
Add any missing grade levels.
Manually Enroll Students
Locate and Enroll a Student
Tool Search: Student Locator Wizard
Ensure Context is set to the RI Provisioning Only calendar.
Enter the student’s State ID on the Student Locator Wizard.
Select Search to display matching results from both the state and district databases.
If the Name, Gender and Birth Date match the ATC data, select the result to import the student. Proceed to Step 4.
If an arrow is displayed in front of the name, the student is already in your database but may not be currently enrolled. Select the result to go to the student’s enrollments. If the student is not currently enrolled, a new enrollment is needed. Select New, then go to Step 6.
If perfect match is not found, STOP. Do not use Create New Student. Confirm the student’s data with ATC as all students should exist.
Complete the Race/Ethnicity data using the information provided by the ATC.
Scroll down to the Enrollment Detail section.
Verify that Calendar has the correct year RI Provisioning Only calendar.
Select the Grade using the information provided by the ATC.
Set Start Date using the information provided by the ATC. This date cannot be before the first day of school in the selected calendar.
Set Local Start Status using the information provided by the ATC.
Change Service Type to S: Partial.
Select Save.
Campus will display the Student Records Transfer screen. DO NOT SUBMIT A REQUEST.
Refresh the browser (Ctrl + R) to return the Search parameters.
State Exclude the RI Provisioning Only enrollments
Tool Search: Enrollment
Select the District Office and RI Provisioning Only calendar in the Context.
Select Search Student.
Enter the State ID.
Select the RI Provisioning Only enrollment to see the details.
Under General Enrollment Information, verify that the Service Type is S: Partial. If not, update it.
Under State Reporting Fields, check State Exclude.
Select Save.
The Enrollment summary information will be in red font for state excluded enrollments.
Notes
These enrollments should be end dated if a student withdraws from the ATC.
At the end of the year, post the proper end date and end status on all students.
If the ATC students accounts should be disabled over the summer, wait until the start of the next school year to roll forward enrollments.